Building a House in Nepal from Abroad: A Step-by-Step Guide for NRNs
Step-by-step guide for NRNs building a house in Nepal from abroad — budget, land papers, design, naksa pass, contractor selection, stage payments and remote tracking.
GharNaksa Team
Construction tracking for Nepal
Building a house in Nepal from abroad is one of the largest projects most NRNs ever take on — and one of the hardest to manage. You are coordinating land papers, drawings, municipal approval, a contractor and monthly transfers of hard-earned savings, all from a different time zone, through phone calls and photos.
Distance does not have to mean losing control. What it does mean is that the order of decisions matters more for you than for anyone building locally: every control you skip at the start becomes a dispute you cannot resolve from 10,000 km away. This guide walks through the full sequence, step by step. For the day-to-day side — evidence, ledgers and reporting once work is underway — see our companion NRN guide to running a build from abroad.
Step 1: Define the project and budget it in both currencies
Before drawings or contractors, write down what you are actually building: how many floors, roughly how much built-up area, what specification of finishing, and what the house is for — a family home now, a rental, or a retirement plan. Each answer changes the budget and the design brief.
Then build the budget in NPR first, with an explicit contingency, using our house construction cost breakdown and the construction cost calculator. Because your income is in dollars, dirhams, pounds or another currency, convert that NPR budget into your earning currency with the diaspora house budget calculator — exchange-rate movement and transfer costs are part of your real budget. The full funding side is covered in how to budget and fund a house from abroad.
Step 2: Get the land and paperwork in order
- Confirm ownership. The lalpurja (land ownership certificate) should be in the name of whoever will apply for the building permit. If the land is inherited or shared, settle that on paper before anything else. Still shopping for the plot? Start with our guide to buying and verifying land from abroad.
- Check the plot against reality. Boundaries, access road and any past disputes — have someone you trust walk the plot and compare it with the papers.
- Check what can be built there. Municipalities set rules on land use, setbacks and building height. Ask the ward or municipal office before you invest in drawings.
- Arrange authority to act for you. If a family member will handle registration or approvals on your behalf, a power of attorney is the usual route — NRNs typically arrange this through a Nepali embassy or consulate. Requirements change, so confirm the current process with the Land Revenue Office or a Nepali lawyer before relying on it.
Land in Nepal is measured in ropani–aana or bigha–katha depending on the region; the free land area converter translates between local units and square feet or square meters.
Step 3: Choose your architect and engineer
Municipal approval needs proper architectural and structural drawings, normally prepared by a registered engineer or architect. Do not treat this as a formality: the same drawings decide how your rooms feel, how the structure handles earthquakes, and what the contractor can and cannot charge you for later.
- Interview two or three designers over video call. Ask to see houses they have completed, not just renders.
- Insist on reviewing the design properly before approving it. A 2D plan is hard to judge from abroad — a walkthrough of the 3D model over a call catches problems early. See how to review a 3D house model online and try the 3D house model reviewer.
- Separately, hire a site engineer who reports to you — not one supplied by the contractor. Independent monthly inspections are one of the cheapest controls an NRN can buy.
Step 4: Get the naksa pass (municipal building approval)
Construction should not start before the municipality approves your drawings — building without a permit risks fines, demolition orders and trouble when you later need utility connections or want to sell. The naksa pass process runs through your municipality or ward office, and the documents, fees and stages vary from place to place.
Our naksa pass documents and cost checklist lists what is typically asked for, and the naksa pass cost calculator helps you estimate the fees. A local representative or your designer can usually run the process with your authorization — but keep copies of every submitted document and receipt in your own records, not just theirs.
Step 5: Select the contractor and sign a real contract
This is the decision NRNs most often rush — usually because a relative “knows someone.” Slow down and run it like a procurement:
- 1Decide the contract model: labor-only (you buy materials) or with materials (thekka). Labor-only gives you more control over material quality and spending, but needs someone reliable managing purchases on the ground.
- 2Get at least three written quotations against the same drawings and item list, so you are comparing like with like.
- 3Check each quotation line by line for missing items, vague rates and lump sums — our contractor quotation guide and the contractor quote checker show exactly what to look for.
- 4Visit (or have someone visit) houses each contractor finished at least a year ago, and talk to those owners about delays, quality and how disputes were handled.
- 5Sign a written contract: scope, rates, who buys materials, milestone dates, payment stages, and what happens when either side defaults. Never start on a handshake — see how to choose a contractor in Nepal.
Step 6: Fix the payment schedule and budget controls before work starts
For an NRN, the payment schedule is the control system. Once money leaves your account, you have very little leverage — so structure it before the first payment:
- Pay against verified stages, not requests. Release each installment when the agreed milestone — plinth, slab, roof, plaster — is documented as complete, not when someone calls to say cash is short. Our payment schedule guide and payment schedule calculator help you set the stages and percentages.
- Keep the advance small and hold back a retention amount until defects from the final walkthrough are fixed.
- Send money through banking channels and keep every transfer record. Compare providers by the final NPR received, not the advertised fee — see how to compare remittance rates and fees and the remittance comparison tool.
- Record every transfer against a purpose: which stage or bill this money funds, at what exchange rate, and how much NPR actually arrived.
Step 7: Set up remote progress reporting before the first brick
Decide the reporting rhythm while everyone is still agreeable, and put it in the contract conversation: dated photos at every stage, a short site log of what happened each week, and a video call at the moments that matter most — slab pours, when you can see the site live at its most critical point.
A family WhatsApp group is where most NRN builds keep this record — and where it falls apart, scattered across thousands of messages nobody can add up. The daily site log habit takes ten minutes a day, and WhatsApp vs. a construction tracker explains why chat alone is not an audit trail.
Step 8: Track materials, labor and payments in one shared ledger
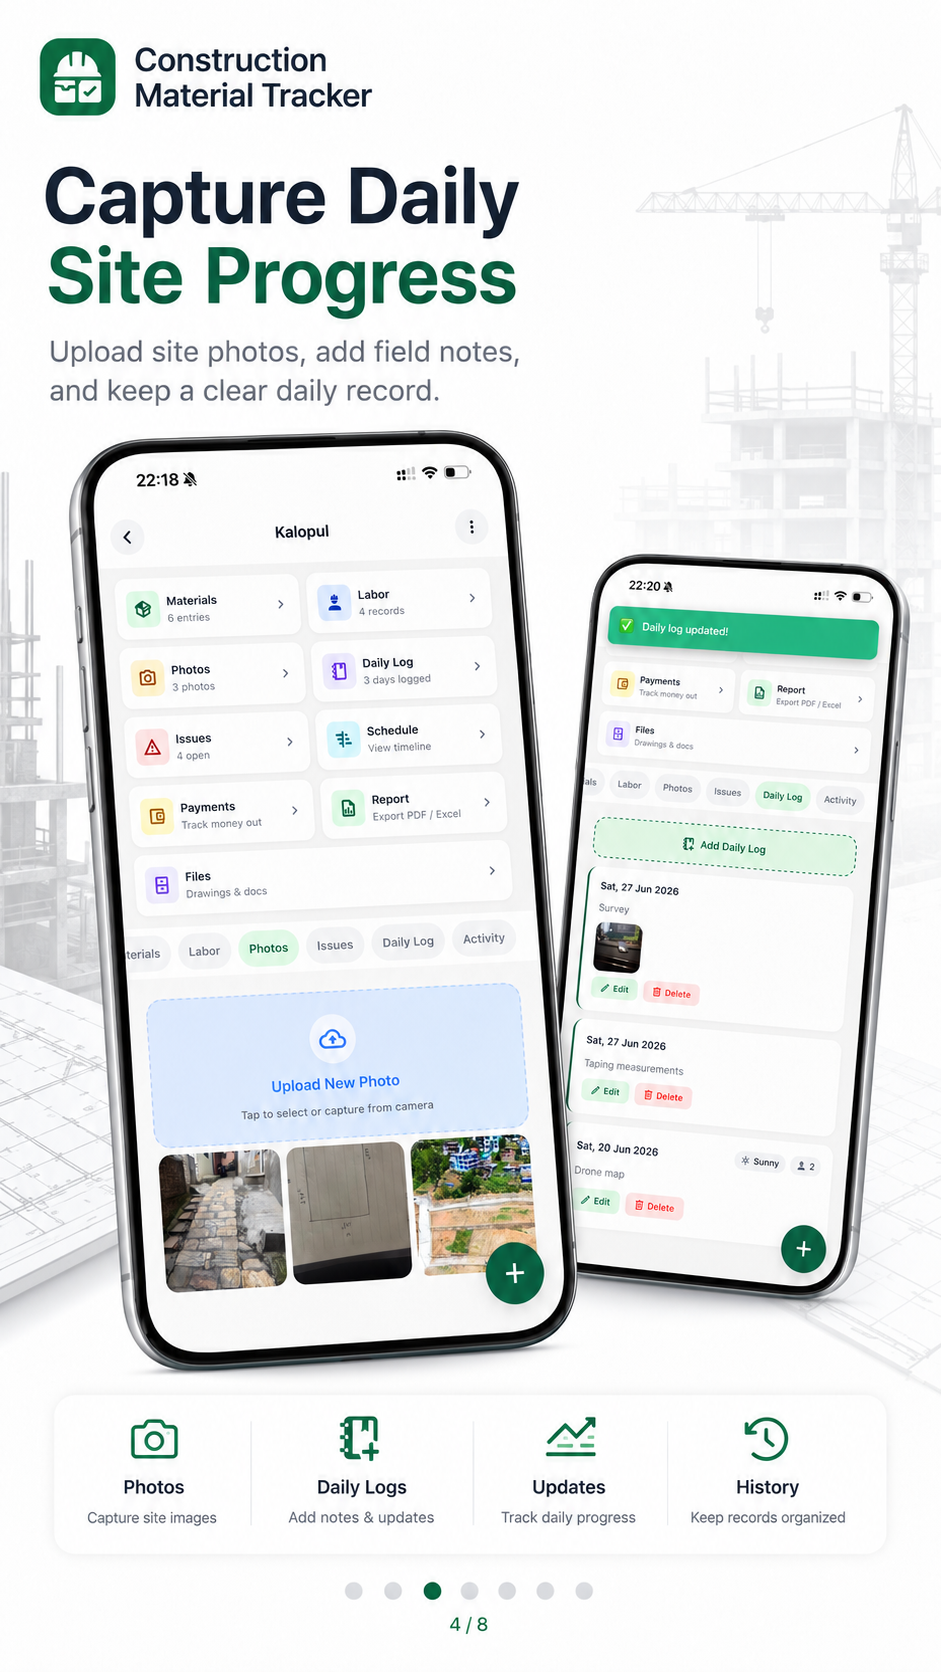
From the first delivery of cement, three running records decide whether your budget survives: a material ledger (every delivery with quantity, rate and supplier — see how to track cement, rod and sand), a labor log of mason and helper days (see labor cost tracking), and a payment ledger of every rupee out against the budget.
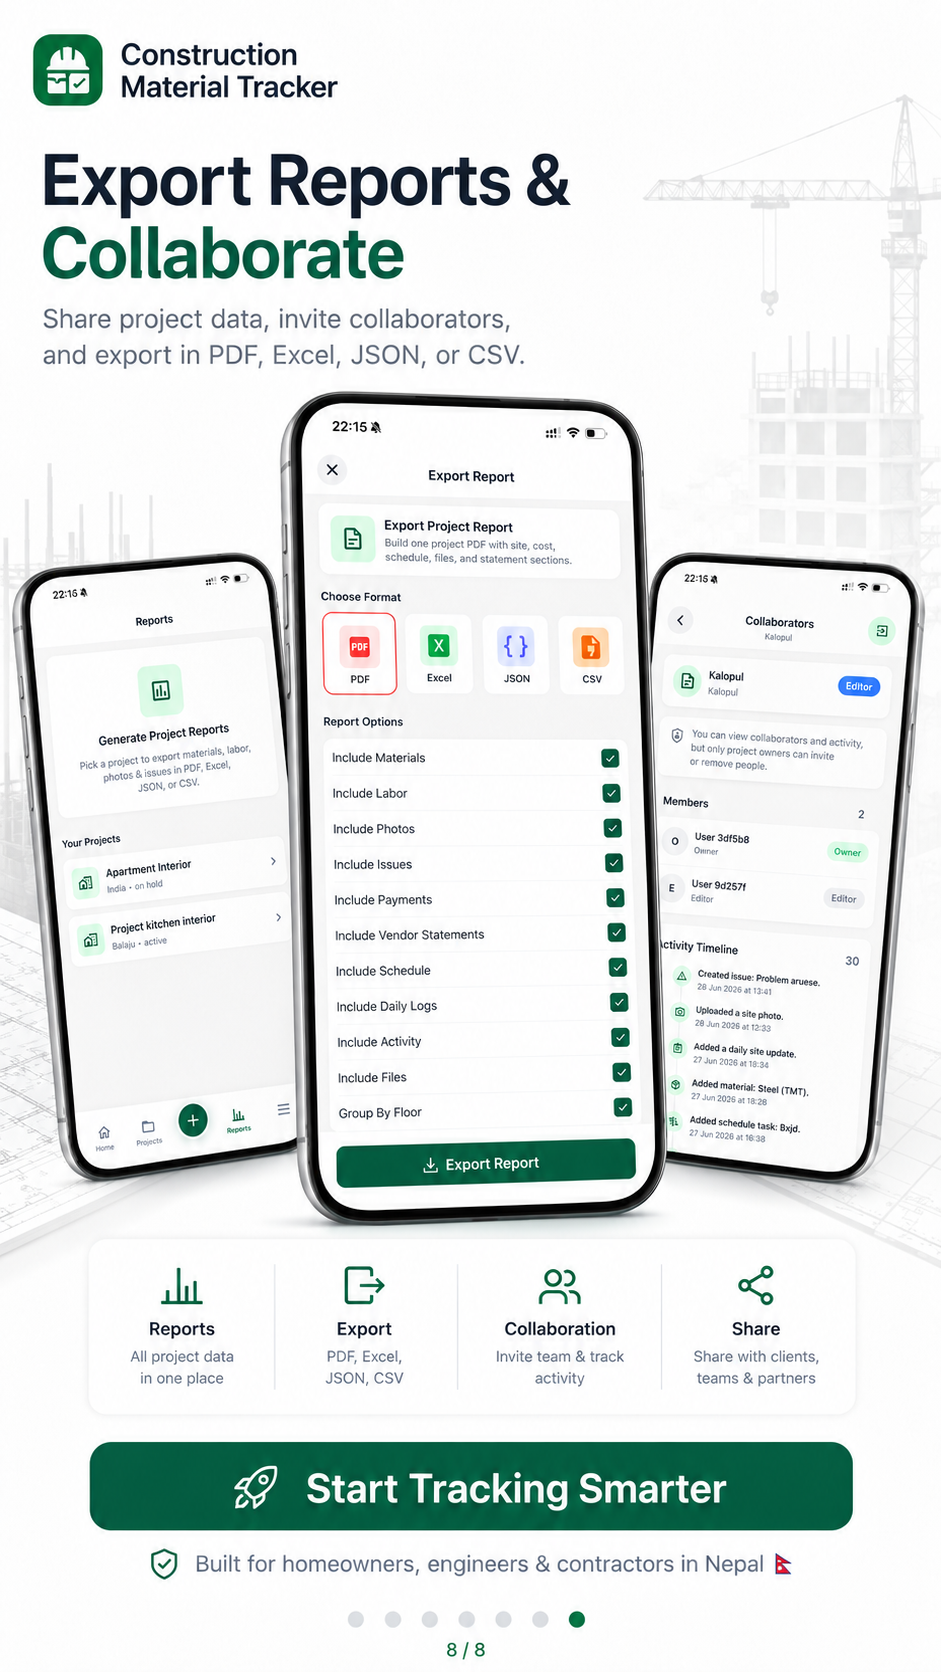
This is the gap GharNaksa was built for: your family member or supervisor logs materials, labor, payments and photos on site, and you see every entry live from any country, with running totals against budget — the NRN features include a dated photo timeline and a monthly PDF statement.
Step 9: Plan your visits and the handover
If you can visit Nepal only once or twice during the build, time the trips around decisions, not convenience: finalizing the design and contract, or the finishing stage, when hundreds of small choices land in one month. For handover, do a slow walkthrough with your engineer, write a snag list into the record, and release the retained payment only after it is cleared. Collect the complete file — approved drawings, permit papers, receipts and any completion paperwork your municipality requires — in one place you control.
Common mistakes NRNs make
- Sending money on demand instead of against documented milestones.
- No single decision-maker on the ground — when three relatives share responsibility, nobody has it.
- Letting the contractor supply the “supervising” engineer, which quietly removes your only independent check.
- Skipping the written contract because the builder is family or a friend — the projects most likely to end in silence and resentment.
- Starting work before the naksa pass is approved to “save time,” then paying for it at every later step.
- No photo record of covered-up work, leaving quality disputes unwinnable.
- Choosing a remittance provider by advertised fee instead of the final NPR received.
The step-by-step checklist
- 1Write the project brief: floors, area, specification, purpose.
- 2Build the NPR budget with contingency, then convert it to your earning currency.
- 3Verify the lalpurja, plot boundaries and municipal rules for the land.
- 4Arrange power of attorney if someone will act for you (confirm current requirements).
- 5Appoint an architect/engineer and review the design — ideally on the 3D model — before approving.
- 6Hire an independent site engineer who reports to you.
- 7Obtain the naksa pass before any work starts; keep copies of everything.
- 8Collect at least three comparable quotations and check them line by line.
- 9Sign a written contract with a stage-wise payment schedule and retention.
- 10Set the reporting rhythm: dated photos, weekly log, slab-pour video calls.
- 11Track materials, labor and payments in one shared ledger from day one.
- 12Time your visits around design and finishing; do a documented handover walkthrough.
Frequently asked questions
Can I build a house in Nepal without visiting at all?
Many NRNs complete builds with only one or two visits, and paperwork can usually be handled by a trusted person with power of attorney. It works when the structure is strong: an independent engineer, stage-wise payments and a shared record of money and progress. If you can make even one trip, spend it on the design-and-contract stage — that is where the most expensive decisions are locked in.
How much does it cost to build a house in Nepal?
There is no single number — rates vary widely by city, plot, specification and how prices move. Build your own estimate from current local rates using the construction cost guide and cost calculator, and always carry an explicit contingency.
How long does the whole process take?
Plan in stages rather than a fixed number of months: design and approval first, then the build itself across seven broad construction stages. Monsoon, funding gaps and slow decision-making are the usual sources of delay — the last two are the ones you control from abroad.
Do I need to be in Nepal for the naksa pass?
Usually not in person — your designer or an authorized local representative can typically run the application. Requirements and fees differ by municipality, so have them confirm the current checklist with your ward office; our naksa pass checklist covers what is commonly required.
How should I send construction money to Nepal?
Use formal banking or remittance channels, keep every transfer record, and compare providers by the final NPR received for the same foreign-currency amount. Then tie each transfer to a stage of the build, so your funding record and construction record stay in sync — see comparing remittance rates and fees to Nepal.